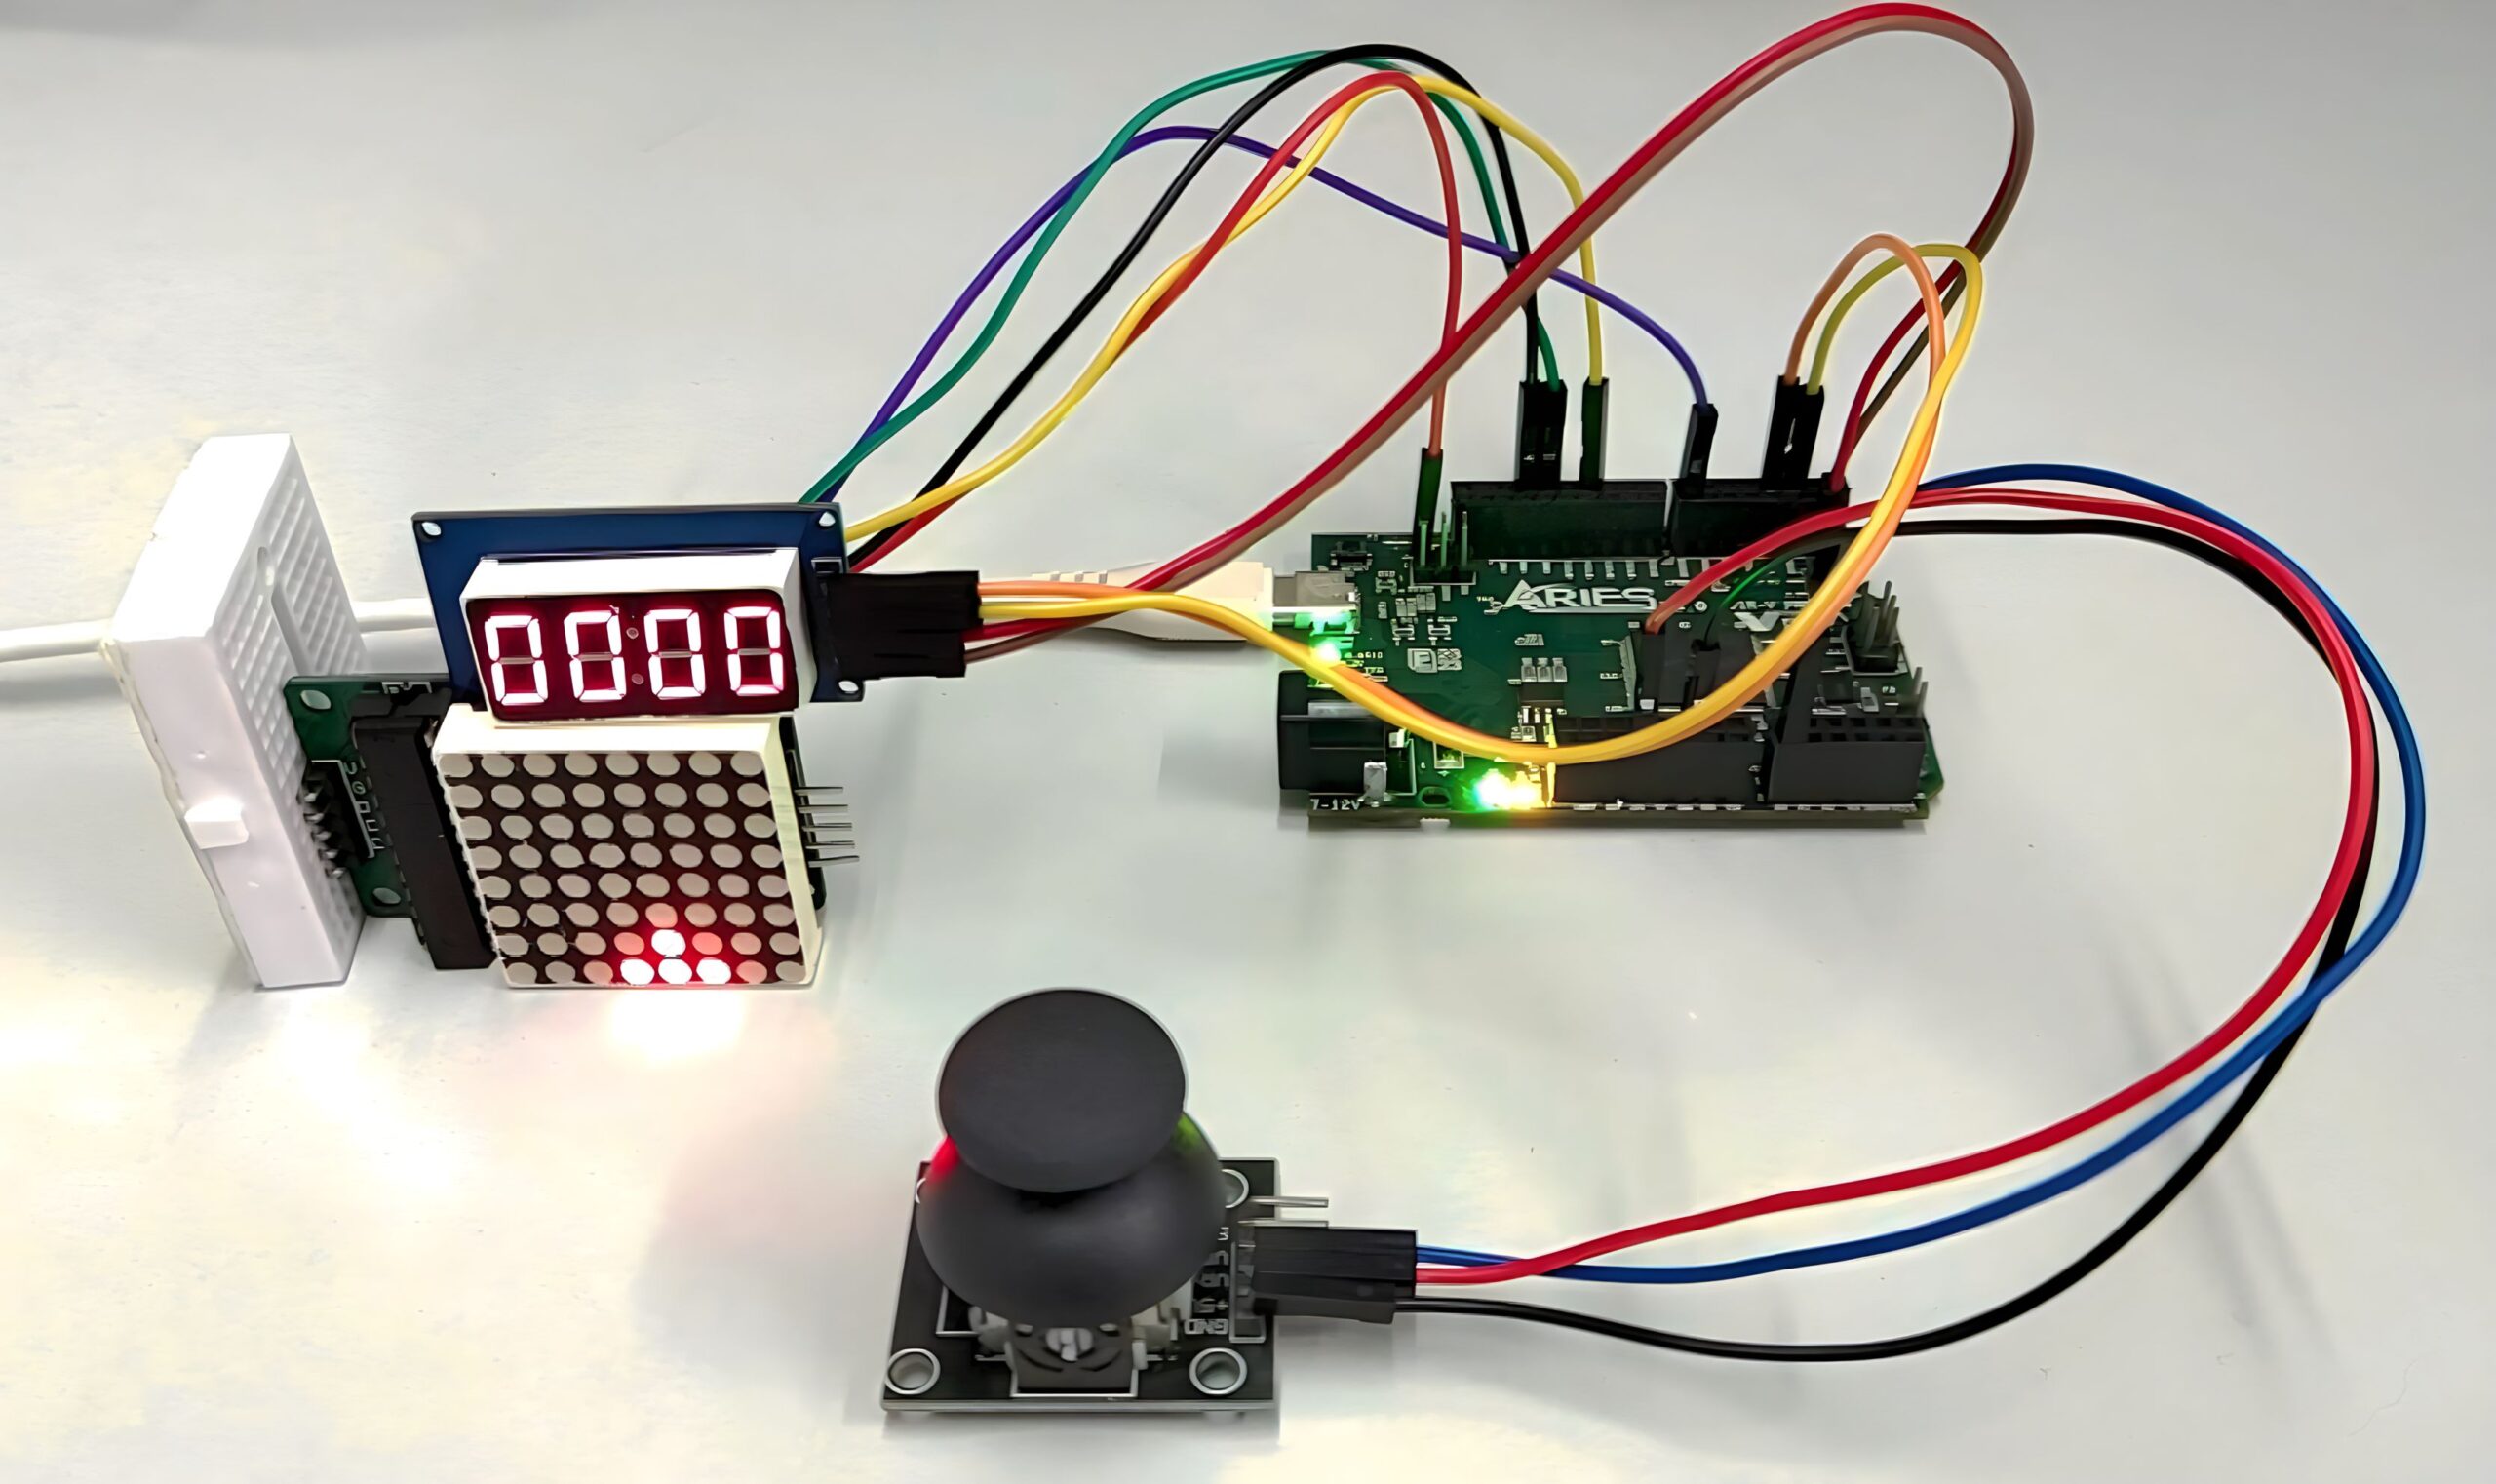
In this tutorial we will be making PONG Game with ARIES v3 board. I am sure you played this game on your mobile phone, let try it on LED Matrix. Here we will be using 8×8 LED Matrix to display the game, 4-Digit display to display the score and Joystick to control the game.
Prerequisites
- Windows 10 or above/Linux (64 bit)
- Arduino IDE
- VEGA ARIES Board support package
Hardware Required
- ARIES v3.0 Board
- MAX7219 Dot Let Matrix Module
- 4-Digit Display
- Analog Joystick
- Jumper Wires
Note: All of the following boards can be used for this project
ARIES v3.0 Board
The ARIES v3.0 is a fully indigenous and a “Made in India” product to get started with basic microprocessor programming and embedded systems. This board is built upon a RISC-V ISA compliant VEGA Processor with easy-to-use hardware and software. For more details about ARIES v3.0 boards please refer to the ARIES development boards and Ecosystem.
MAX7219 Dot Led Matrix Module
The MAX7219/MAX7221 are compact, serial input/output common-cathode display drivers that interface microprocessors (µPs) to 7-segment numeric LED displays of up to 8 digits, bar-graph displays, or 64 individual LEDs.
4-Digit Display
7 Segment LED displays are used in many applications as front panel number indicators. The most common applications are calculators, microwave ovens, electronic lab equipment like function generators and frequency counters. A 7-segment LED display consists of 7 LEDs arranged in such a way that it can display numbers from 0 to 9. The arrangement of LEDs in the display can be either common anode or common cathode. In this project, a 4 – digit 7 – segment LED display is used to display numbers using Arduino.
Analog Joystick
The Analog Joystick is similar to two potentiometers connected together, one for the vertical movement (Y-axis) and other for the horizontal movement (X-axis). The joystick also comes with a select switch. It can be very handy for retro gaming, robot control or RC cars. In this project we are just going to use its X-axis.
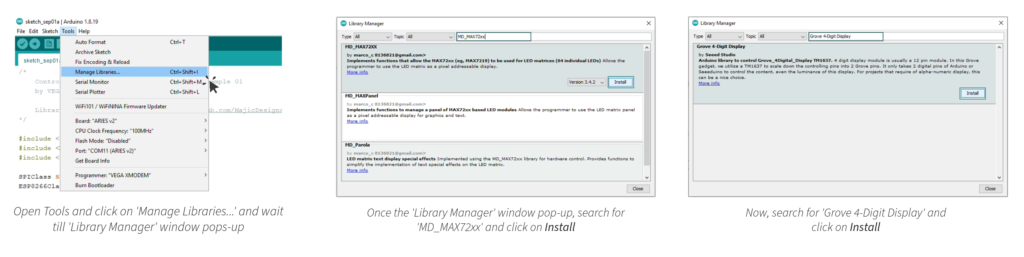
Libraries Required
Download the MD_MAX72XX and Grove 4-digit Display Library from Tools >> Manage Libraries…
Circuit Diagram
Now let’s connect the 8×8 LED Matrix, HC-05 Bluetooth module and 4-Digit display with the ARIES v3 board.
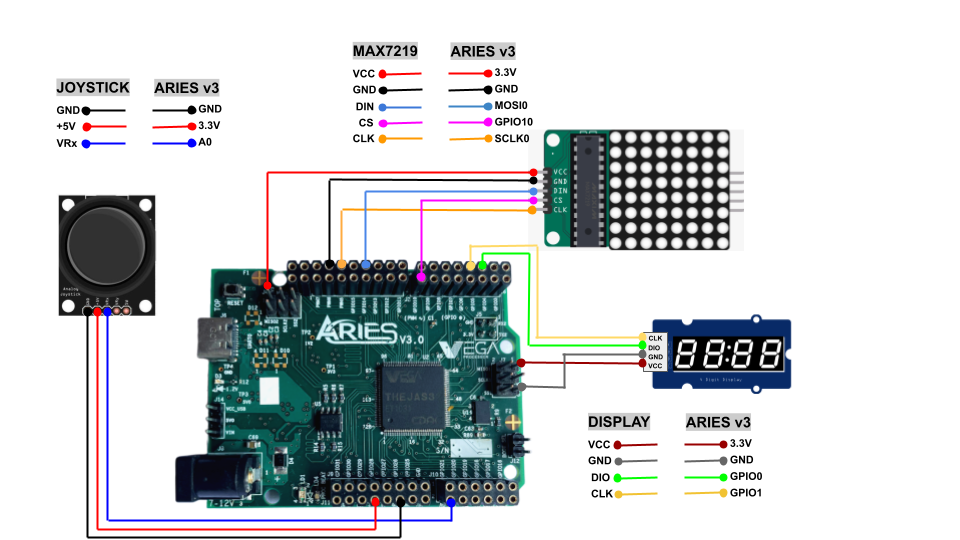
Connections
| 8X8 LED MATRIX | ARIES v3.0 |
| VCC | 3.3V |
| GND | GND |
| DIN | MOSI-0 |
| CS | GPIO-10 |
| CLK | SCLK-0 |
| Analog Joystick | ARIES v3.0 |
| +5V | 3.3V |
| GND | GND |
| VRx | A0 |
| 4-Digit Display | ARIES v3.0 |
| VCC | 3.3V |
| GND | GND |
| DIO | GPIO-0 |
| CLK | GPIO-1 |
Arduino Code
Once we are done with the connections, we are ready to take a look at the Arduino code.
/*
    Joystick Controlled Pong Game on Dot Matrix
    by VEGA Processors, www.vegaprocessors.in

    Library Required: 1) MD_MAX72xx [https://github.com/MajicDesigns/MD_MAX72XX]
                      2) Grove_4Digital_Display by Seeed-Studio [https://github.com/Seeed-Studio/Grove_4Digital_Display]
*/


#include <MD_MAX72xx.h>
#include <SPI.h>
#include <TM1637.h>

SPIClass SPI(0);  // selecting SPI port-0

#define SPEED_FROM_ANALOG 0   // optional to use analog input for speed control
#define DEBUG 0   // Enable or disable (default) debugging output
#define CLK 1     //CLK of TM1637 is connected to GPIO-1 pin of Aries Board
#define DIO 0     //DI0 of TM1637 is connected to GPIO-0 pin of Aries Board

#if DEBUG
#define PRINT(s, v)   { Serial.print(F(s)); Serial.print(v); }      // Print a string followed by a value (decimal)
#define PRINTX(s, v)  { Serial.print(F(s)); Serial.print(v, HEX); } // Print a string followed by a value (hex)
#define PRINTS(s)     { Serial.print(F(s)); }                       // Print a string
#else
#define PRINT(s, v)   // Print a string followed by a value (decimal)
#define PRINTX(s, v)  // Print a string followed by a value (hex)
#define PRINTS(s)     // Print a string
#endif

TM1637 tm(CLK,DIO);

#define HARDWARE_TYPE MD_MAX72XX::FC16_HW
#define MAX_DEVICES 1 // Define the number of devices we have in the chain and the hardware interface
#define CS_PIN    10  // connect CS pin to GPIO-10
/* NOTE: You can use any GPIO pin */

MD_MAX72XX mx = MD_MAX72XX(HARDWARE_TYPE, CS_PIN, MAX_DEVICES);

#if SPEED_FROM_ANALOG
const uint8_t SPEED_POT = A1;
#endif

// --------------------
// Constant parameters
//
const uint32_t TEXT_MOVE_DELAY = 100;   // in milliseconds
const uint32_t BAT_MOVE_DELAY = 50;     // in milliseconds
const uint32_t BALL_MOVE_DELAY = 100;   // in milliseconds
const uint32_t END_GAME_DELAY = 2000;   // in milliseconds

const uint8_t BAT_SIZE = 3;             // in pixels, odd number looks best

char *welcome;
bool messageComplete;
static int score;
int finalScore;

// ========== General Variables ===========
//
uint32_t prevTime = 0;    // used for remembering the mills() value
uint32_t prevBatTime = 0; // used for bat timing

// ========== Control routines ===========
//

uint8_t scrollDataSource(uint8_t dev, MD_MAX72XX::transformType_t t)
// Callback function for data that is required for scrolling into the display
{
  static char* p;
  static enum { INIT, LOAD_CHAR, SHOW_CHAR, BETWEEN_CHAR } state = INIT;
  static uint8_t  curLen, showLen;
  static uint8_t  cBuf[15];
  uint8_t colData = 0;    // blank column is the default

  // finite state machine to control what we do on the callback
  switch(state)
  {
    case INIT:   // Load the new message
      p = welcome;
      messageComplete = false;
      state = LOAD_CHAR;
      break;

    case LOAD_CHAR: // Load the next character from the font table
      showLen = mx.getChar(*p++, sizeof(cBuf)/sizeof(cBuf[0]), cBuf);
      curLen = 0;
      state = SHOW_CHAR;

      // !! deliberately fall through to next state to start displaying

    case SHOW_CHAR: // display the next part of the character
      colData = cBuf[curLen++];
      if (curLen == showLen)
      {
        if (*p == '\0')    // end of message!
        {
          messageComplete = true;
          state = INIT;
        }
        else  // more to come
        {
          showLen = 1;
          curLen = 0;
          state = BETWEEN_CHAR;
        }
      }
      break;

    case BETWEEN_CHAR: // display inter-character spacing (blank columns)
      colData = 0;
      curLen++;
      if (curLen == showLen)
        state = LOAD_CHAR;
      break;

    default:
      state = LOAD_CHAR;
  }

  return(colData);
}

void scrollText(void)
{
  // Is it time to scroll the text?
  if (millis() - prevTime >= TEXT_MOVE_DELAY)
  {
    mx.transform(MD_MAX72XX::TSL);  // scroll along - the callback will load all the data
    prevTime = millis();      // starting point for next time
  }
}

void resetDisplay(void)
{
  mx.control(MD_MAX72XX::INTENSITY, MAX_INTENSITY/2);
  mx.control(MD_MAX72XX::UPDATE, MD_MAX72XX::ON);
  mx.clear();
}

inline bool swL(void) { return(analogRead(0)>1000); }
inline bool swR(void) { return(analogRead(0)<400); }
#if SPEED_FROM_ANALOG
inline uint32_t speed(void) { return(map(analogRead(SPEED_POT),0, 1640, 0, 300)); }
#else
inline uint32_t speed(void) { return(BALL_MOVE_DELAY); }
#endif

void drawBat(int8_t x, int8_t y, bool bOn = true)
{
  for (uint8_t i=0; i<BAT_SIZE; i++)
    mx.setPoint(y, x + i, bOn);
}

void drawBall(int8_t x, int8_t y, bool bOn = true)
{
  mx.setPoint(y, x, bOn);
}

void displayNumber(int num){
    tm.display(3, num % 10);
    tm.display(2, num / 10 % 10);
    tm.display(1, num / 100 % 10);
    tm.display(0, num / 1000 % 10);
}

void setup(void)
{
  mx.begin();
  tm.init();

  //set brightness; 0-7
  tm.set(7);
  displayNumber(0000);

#if SPEED_FROM_ANALOG
  pinMode(SPEED_POT, INPUT);
#endif

#if DEBUG
  Serial.begin(115200);
#endif
  PRINTS("\n[MD_MAX72XX Simple Pong]");
}

void loop(void)
{
  static enum:uint8_t { INIT, WELCOME, PLAY_INIT, WAIT_START, PLAY, END , FINAL_SCORE } state = INIT;

  static int8_t ballX, ballY;
  static int8_t batX;
  const int8_t batY = ROW_SIZE - 1;

  static int8_t deltaX, deltaY;   // initialisesd in FSM

  switch (state)
  {
  case INIT:
    PRINTS("\n>>INIT");
    welcome = (char*)"** PONG **";
    resetDisplay();
    mx.setShiftDataInCallback(scrollDataSource);
    prevTime = 0;
    state = WELCOME;
    break;

  case WELCOME:
    PRINTS("\n>>WELCOME");
    scrollText();
    if (messageComplete) state = PLAY_INIT;
    break;

  case PLAY_INIT:
    PRINTS("\n>>PLAY_INIT");
    displayNumber(0000);
    digitalWrite(24, HIGH);
    digitalWrite(22, LOW);
    mx.setShiftDataInCallback(nullptr);
    state = WAIT_START;
    mx.clear();
    batX = (COL_SIZE - BAT_SIZE) / 2;
    ballX = batX + (BAT_SIZE / 2);
    ballY = batY - 1;
    deltaY = -1;            // always heading up at the start
    deltaX = 0;             // initialized in the direction of first bat movement
    drawBat(batX, batY);
    drawBall(ballX, ballY);
    break;

  case WAIT_START:
    //PRINTS("\n>>WAIT_START");
    if (swL()) deltaX = 1;
    if (swR()) deltaX = -1;
    if (deltaX != 0)
    {
      prevTime = prevBatTime = millis();
      state = PLAY;
    }
    break;

  case PLAY:
    // === Move the bat if time has expired
    if (millis() - prevBatTime >= BAT_MOVE_DELAY)
    {
      if (swL())  // left switch move
      {
        PRINTS("\n>>PLAY - move bat L");
        drawBat(batX, batY, false);
        batX++;
        if (batX + BAT_SIZE >= COL_SIZE) batX = COL_SIZE - BAT_SIZE;
        drawBat(batX, batY);
      }

      if (swR())  // right switch move
      {
        PRINTS("\n>>PLAY - move bat R");
        drawBat(batX, batY, false);
        batX--;
        if (batX < 0) batX = 0;
        drawBat(batX, batY);
      }

      prevBatTime = millis();       // set up for next time;
    }

    // === Move the ball if its time to do so
    if (millis() - prevTime >= speed())
    {
      PRINTS("\n>>PLAY - ");

      drawBall(ballX, ballY, false);

      // new ball positions
      ballX += deltaX;
      ballY += deltaY;

      // check for edge collisions
      if (ballX >= COL_SIZE - 1 || ballX <= 0)   // side bounce
      {
        PRINTS("side bounce");
        deltaX *= -1;
      }
      if (ballY <= 0)
      {
        PRINTS("top bounce");
        deltaY *= -1;  // top bounce
      }

      //=== Check for side bounce/bat collision
      if (ballY == batY - 1 && deltaY == 1)  // just above the bat and travelling towards it
      {
        score += 1;
        displayNumber(score);
        PRINT("check bat x=", batX); PRINTS(" - ");
        if ((ballX >= batX) && (ballX <= batX + BAT_SIZE - 1)) // over the bat - just bounce vertically
        {
          deltaY = -1;
          PRINT("bounce off dy=", deltaY);
        }
        else if ((ballX == batX - 1) || ballX == batX + BAT_SIZE) // hit corner of bat - also bounce horizontal
        {
          deltaY = -1;
          if (ballX != COL_SIZE-1 && ballX != 0)    // edge effects elimination
            deltaX *= -1;
          PRINT("hit corner dx=", deltaX);
          PRINT(" dy=", deltaY);
        }
      }

      drawBall(ballX, ballY);

      // check if end of game
      if (ballY == batY)
      {
        PRINTS("\n>>PLAY - past bat! -> end of game");
        state = END;
        finalScore = score;
        score = 0;
      }

      prevTime = millis();
    }
    break;

  case END:
      delay(20);
      PRINTS("\n>>END");
      sprintf(welcome, "GAME OVER  ");
      digitalWrite(22, HIGH);
      digitalWrite(24, LOW);
      mx.setShiftDataInCallback(scrollDataSource);
      prevTime = 0;
      scrollText();
      if (messageComplete) state = FINAL_SCORE;
      break;

  case FINAL_SCORE:
      delay(20);
      Serial.print("SCORE = ");
      Serial.println(finalScore);
      sprintf(welcome, " SCORE : %d    ", finalScore);
      mx.setShiftDataInCallback(scrollDataSource);
      prevTime = 0;
      scrollText();
      if (messageComplete) state = PLAY_INIT;
      break;

   default:
     PRINT("\n>>UNHANDLED !!! ", state);
     state = INIT;
     break;
  }
  delay(50);
}
Procedure
Let’s power up the boards. Make sure the Laptop/Desktop/PC which we’re using should be preinstalled with Arduino IDE and VEGA ARIES boards of latest version.
- Now, Open the Arduino IDE
- Create a new Sketch File -> New
- Copy-paste the above Arduino code to it.
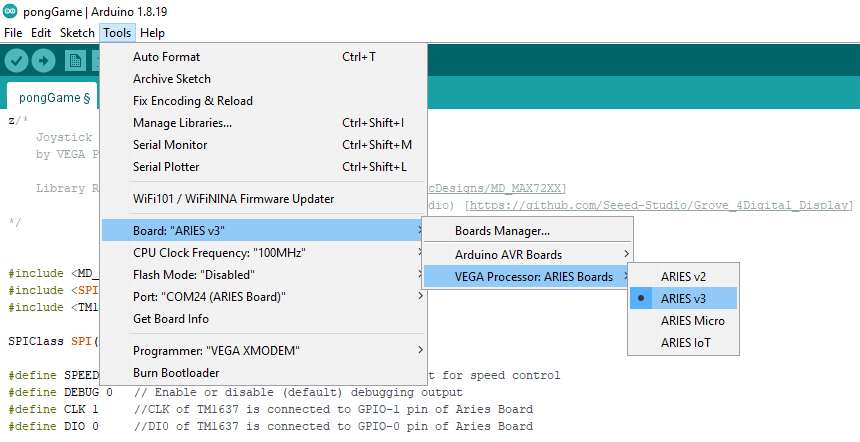
- Make sure you have selected ARIES v3 Board from Tools -> Board -> VEGA Processor: ARIES Boards -> ARIES v3
- Select Programmer as VEGA XMODEM from Tools -> Programmer -> VEGA XMODEM
- Also select appropriate port, Tools -> Port -> COM* (ARIES Board)
- Now, Upload the code in the ARIES v3 board.
Output
Once the code is uploaded, game name will display on 8X8 LED Matrix i.e., PONG. After that bat and ball will display on screen. To start the game, move the joystick to the left or right.
Live score will display on 4-Digit display.