In this tutorial, we will learn how to use EEPROM, short for electrically erasable programmable read-only memory, on ARIES v3.0 boards.
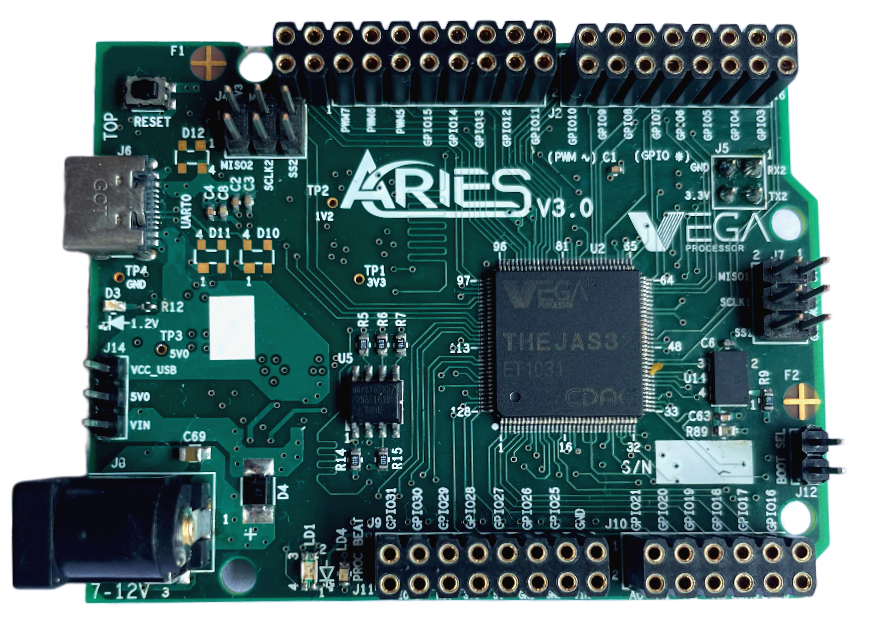
ARIES v3.0 Board
The ARIES v3.0 is a fully indigenous and a “Made in India” product to get started with basic microprocessor programming and embedded systems. This board is built upon a RISC-V ISA compliant VEGA Processor with easy-to-use hardware and software. For more details about ARIES v3.0 boards please refer to the ARIES development boards and Ecosystem.
EEPROM
The ARIES v3.0 have 2 Megabytes of EEPROM: memory whose values are kept when the board is turned off (like a tiny hard drive). This on-board EEPROM is communicate with ARIES v3.0 board using the Serial Peripheral Interface (SPI) protocol.
Prerequisites
- Windows 10 or above/Linux (64 bit)
- Arduino IDE
- VEGA ARIES Board support package
Components Required
- ARIES v3.0 Board
- USB type C to USB type A cable
Note: All of the following boards can be used for this project
Libraries Required
Functions in the EEPROM class is automatically included with the platform for your board, meaning you do not need to install any external libraries.
Procedure
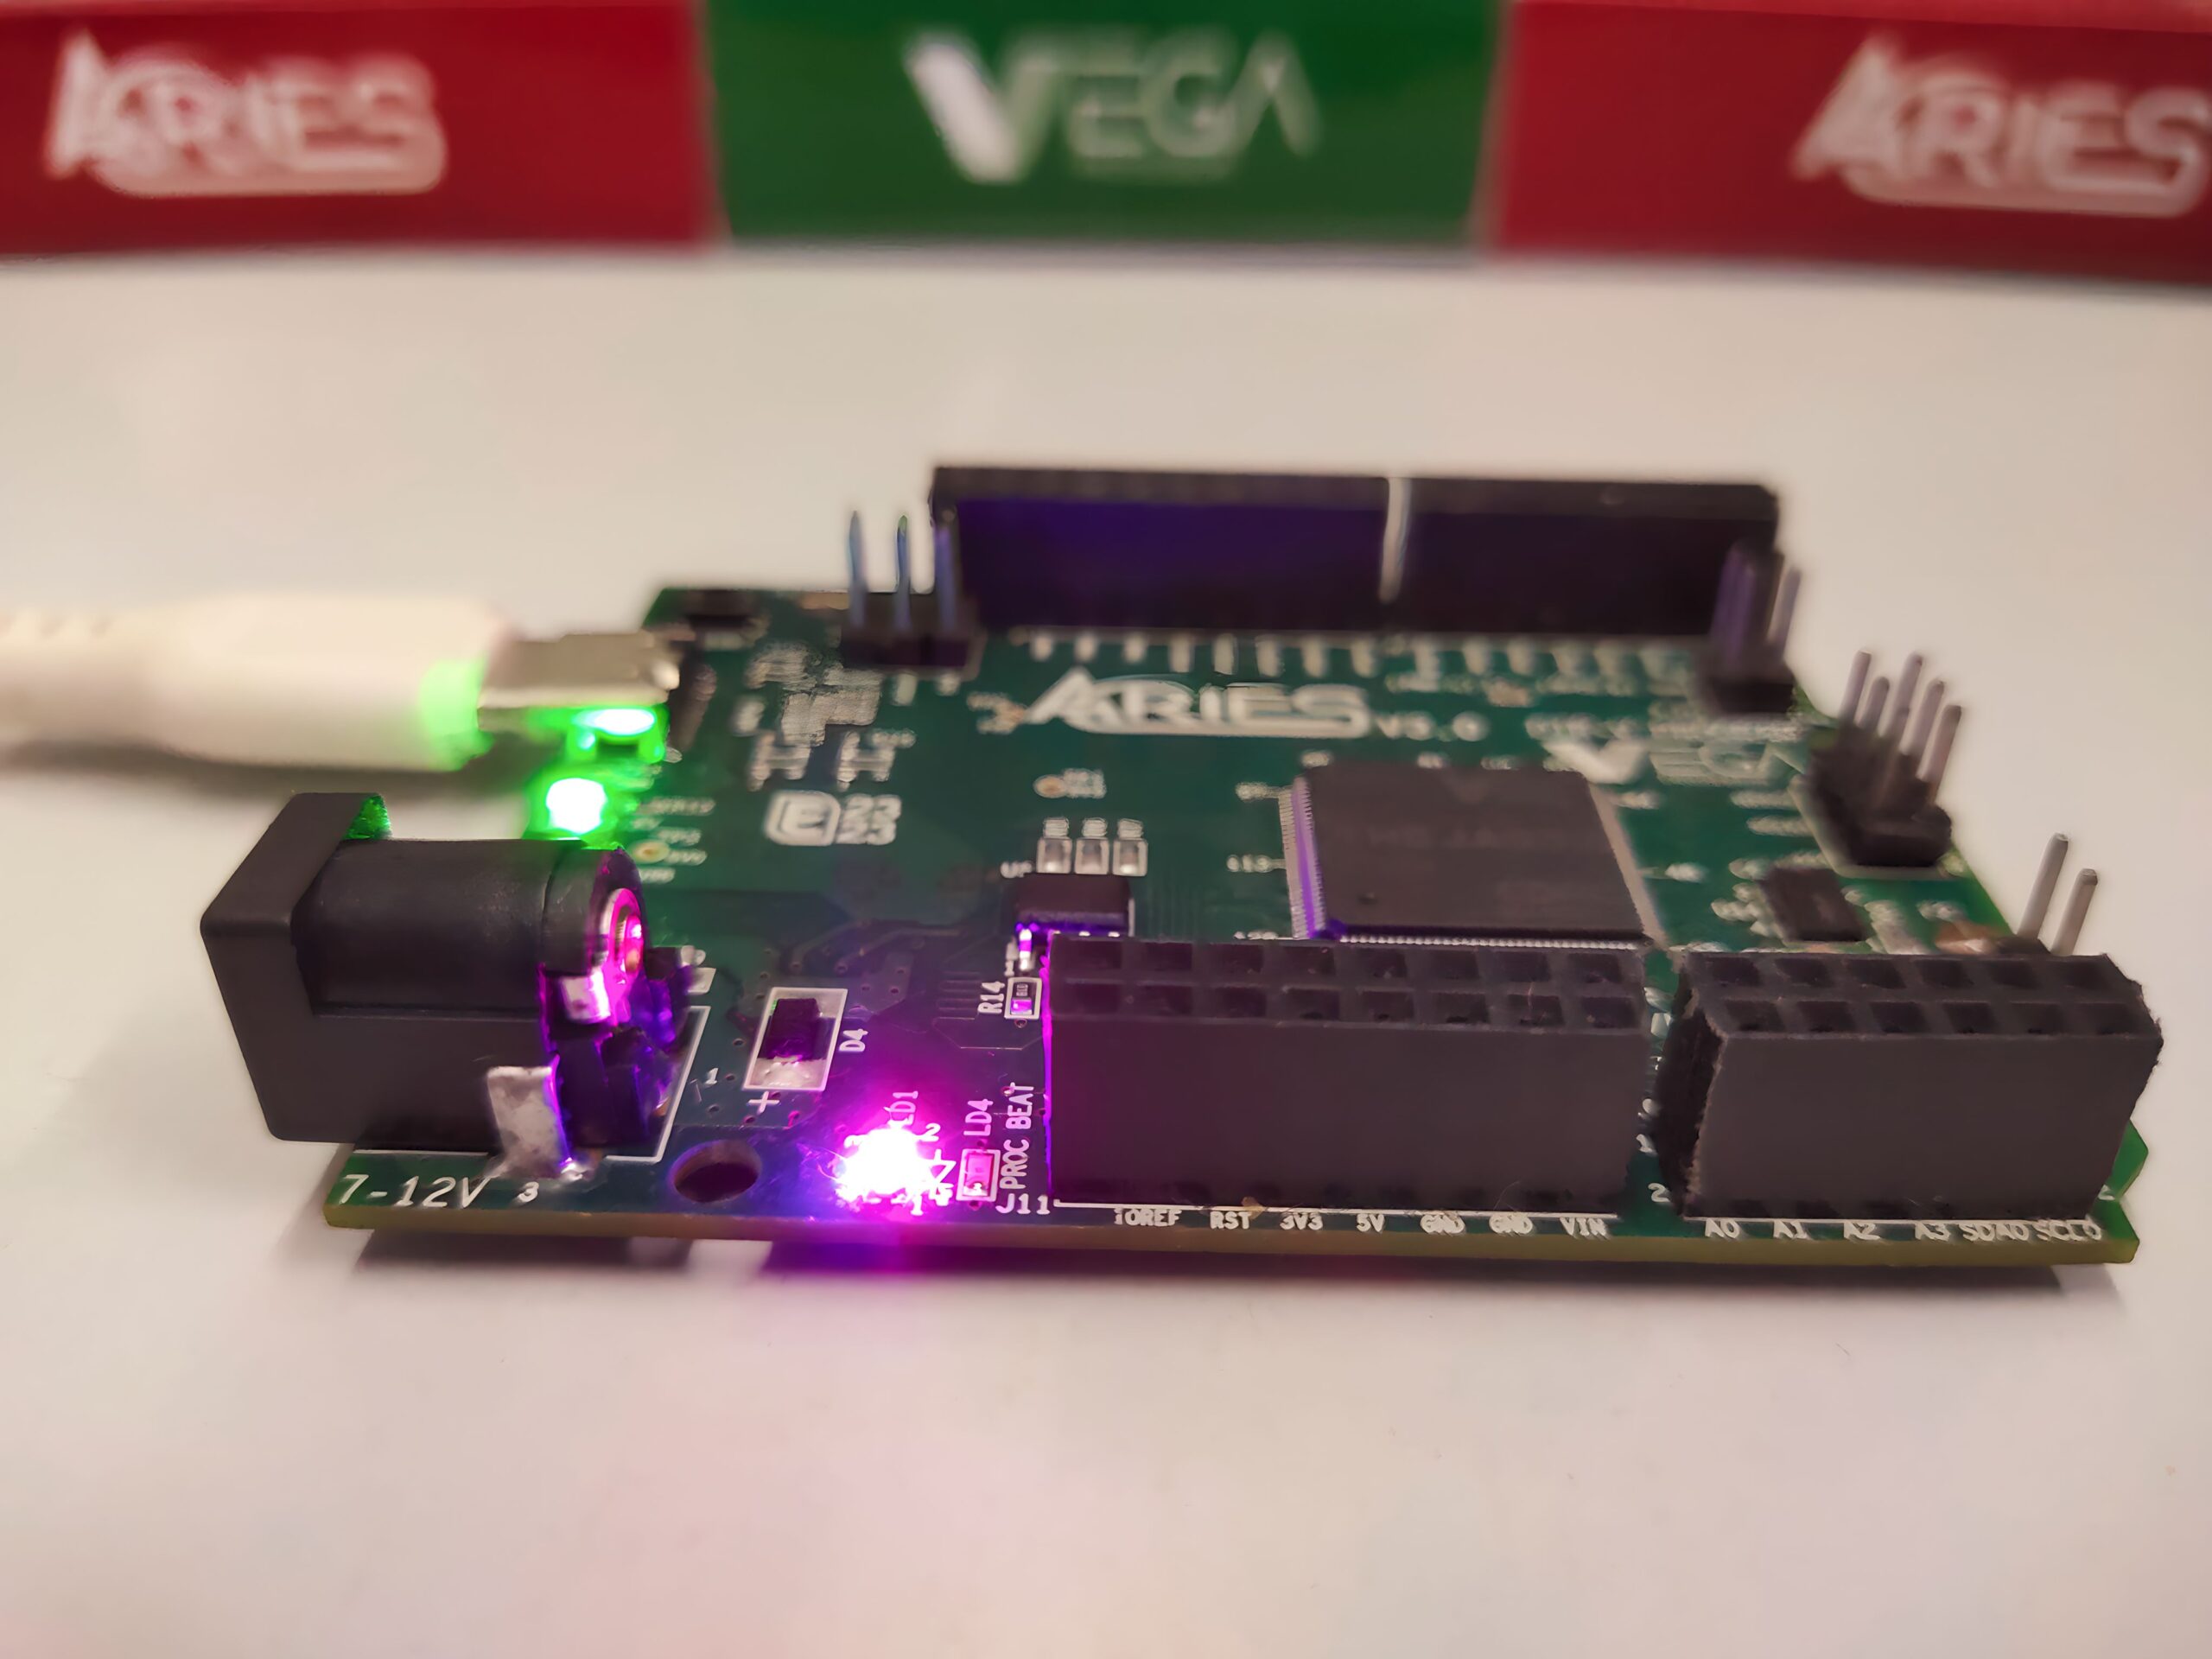
Let’s power up the ARIES v3 board via the USB port of a Laptop/Desktop/PC and burning the code into the ARIES v3 board, we have to use a USB type C to USB type A cable. The cable should be connected to UART-0 port of the ARIES v3 board, and the Laptop/Desktop/PC should be preinstalled with Arduino IDE and VEGA ARIES boards of latest version.
- Now, Open the Arduino IDE
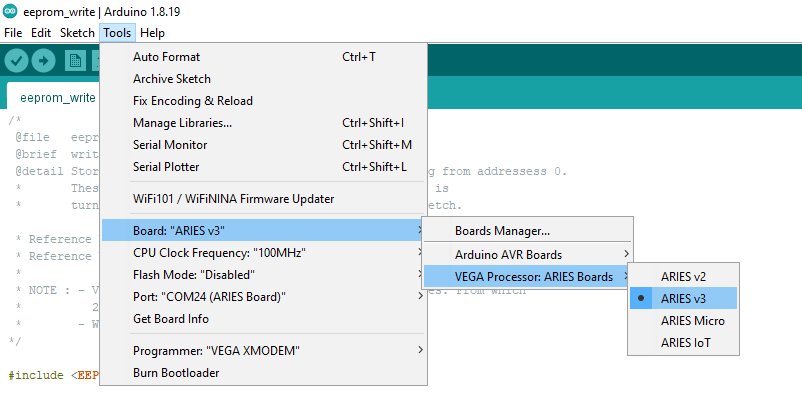
- Make sure you have selected ARIES v3 Board from Tools -> Board -> VEGA Processor: ARIES Boards -> ARIES v3
- Select Programmer as VEGA XMODEM from Tools -> Programmer -> VEGA XMODEM
- Also select appropriate port, Tools -> Port -> COM* (ARIES Board)
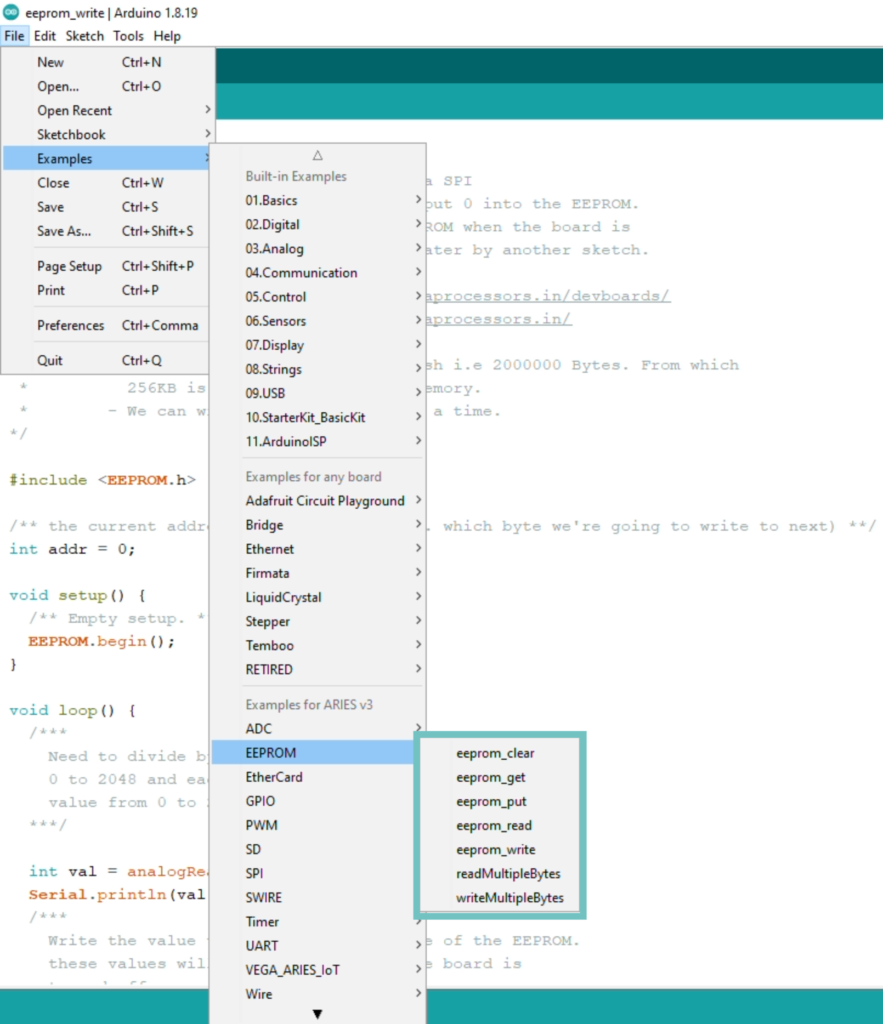
- Here we are going to look at all the examples in File -> Examples -> Under Examples for ARIES v3 -> EEPROM
• EEPROM Clear
This example illustrates how to clear EEPROM, using the EEPROM.clear() function.
Syntax:
EEPROM.clear(value)Parameters:
value: 0 or no parameter to erase the first 4 KB of EEPROM. 1 to completely erase the EEPROM.
Returns:
none
Procedure:
- Open File -> Examples -> Under Examples for ARIES v3 -> EEPROM -> eeprom_clear
- Now, Upload the code.
Output:
Once the program is uploaded, a block of 4KB EEPROM starting from address 0 will erase and green LED will turn on which will indicate completion of erasing process.
• EEPROM Write
This example illustrates how to store values from 0 to 255 (as each byte of the EEPROM can only hold a value from 0 to 255) to the EEPROM with starting address as 0 using the EEPROM.write() function. These values will stay in the EEPROM when the board is turned off and may be retrieved later by another sketch.
Syntax:
EEPROM.write(address, value)Parameters:
address: the location to write to, starting from 0 (int)
value: the value to write, from 0 to 255 (byte)
Returns:
none
Procedure:
- Open File -> Examples -> Under Examples for ARIES v3 -> EEPROM -> eeprom_write
- Now, Upload the code.
Output:
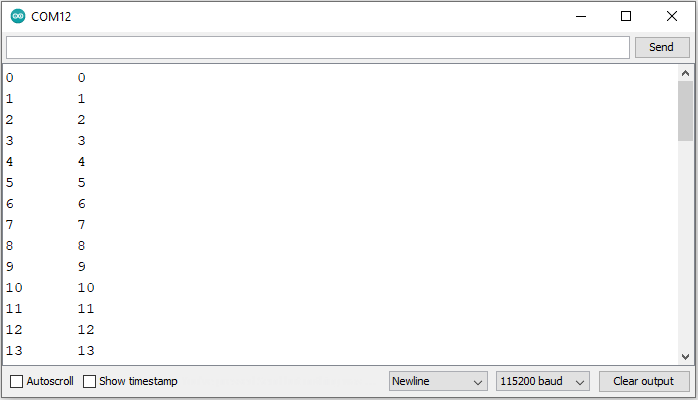
Once the uploading is done, 0 will store on address 0, 1 will store on address 1 and so on till 255 get stores on address 255 of EEPROM. Once the values are stored, green LED will turn on indicating completion of the write.
• EEPROM Read
This example illustrates how to read the value of each byte of EEPROM using the EEPROM.read() function, and how to print those values to the serial window of the Arduino Software (IDE).
Syntax:
EEPROM.read(address)Parameters:
address: the location to read from, starting from 0 (int)
Returns:
the value stored in that location (byte)
Procedure:
- Open File -> Examples -> Under Examples for ARIES v3 -> EEPROM -> eeprom_read
- Now, Upload the code.
Output:
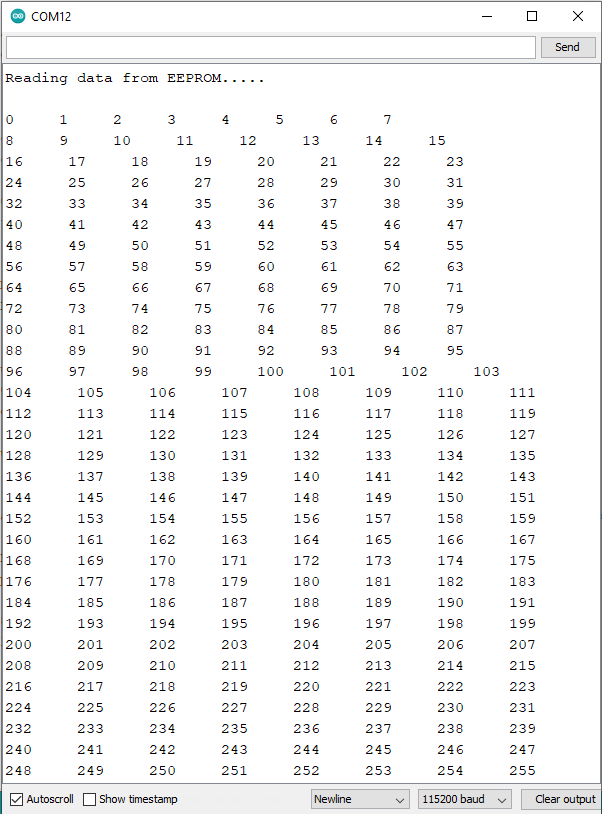
When the code is uploaded, we can see the EEPROM addresses and the data on those addresses started printed on serial monitor. After 255, address will reset to 0.
• EEPROM Write Multiple bytes
In this example we are going to look at how to write multiple bytes of data on EEPROM using EEPROM.write() function. For this we have to pass 3 parameters, which are writing buffer address, length in bytes and starting address of EEPROM. We can write up to 256 bytes of data at a time, so maximum length we can pass to the function will be 256.
Syntax:
EEPROM.write(writeBuffer, length, address)Parameters:
writeBuffer: the data buffer to write on EEPROM
length: the length of data to be write in bytes (max 256 bytes)
address: the location to write to, starting from 0 (int)
Returns:
none
Procedure:
- Open File -> Examples -> Under Examples for ARIES v3 -> EEPROM -> writeMultipleBytes
- Now, Upload the code.
Output:
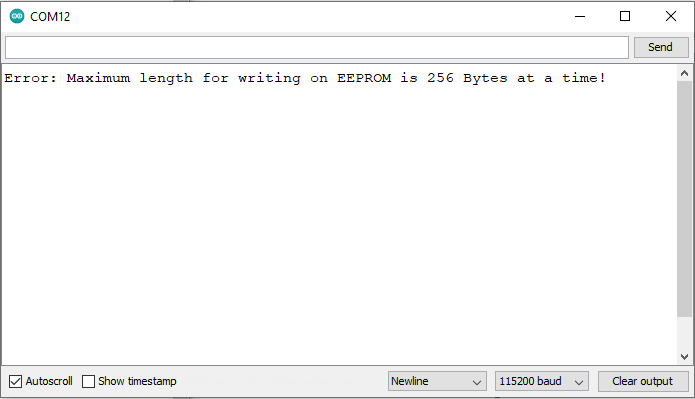
Once the code is uploaded, an array of size 256 bytes will be write on EEPROM starting from address 0 to 255 and Green LED will turn on after completion of the process. If data length exceeds maximum writing capacity (at single time) of 256 Bytes, writing will fail and ERROR message will print on serial monitor. In this case Red LED will turn on.
• EEPROM Read Multiple bytes
This example illustrates how to read multiple byte of data from EEPROM using EEPROM.read() function. For this we have to pass 3 parameter to read() call, which are base address of read buffer, length (in bytes), and starting address of EEPROM. We can read up to 512 bytes of data at a time.
Syntax:
EEPROM.read(readBuffer, length, address)Parameters:
readBuffer: (Out parameter) the data buffer to store read data
length: the length of data to be read in bytes (max 512 bytes)
address: the location to read from, starting from 0 (int)
Returns:
none
Procedure:
- Open File -> Examples -> Under Examples for ARIES v3 -> EEPROM -> readMultipleBytes
- Now, Upload the code.
Output:
Once the code is uploaded, first 256 bytes of data read from EEPROM will get stored in the buffer and displays on Serial Monitor. If the reading length exceeds 512 bytes, the ERROR message will display on Serial monitor.
• EEPROM Put
The purpose of this example is to show the EEPROM.put() method that writes data on EEPROM using the EEPROM.update() that writes data only if it is different from the previous content of the locations to be written. The number of bytes written is related to the datatype or custom structure of the variable to be written.
Syntax:
EEPROM.put(address, data)Parameters:
address: the location to write to, starting from 0 (int)
data: the data to write, can be a primitive type (eg. float) or a custom struct
Returns:
A reference to the data passed in
Procedure:
- Open File -> Examples -> Under Examples for ARIES v3 -> EEPROM -> eeprom_put
- Now, Upload the code.
Output:
Once the code is uploaded, the data of type float will store in EEPROM followed by a structure. Once the data get stored, Green LED will turn On.
Note: View the example sketch eeprom_get to see how you can retrieve the values .
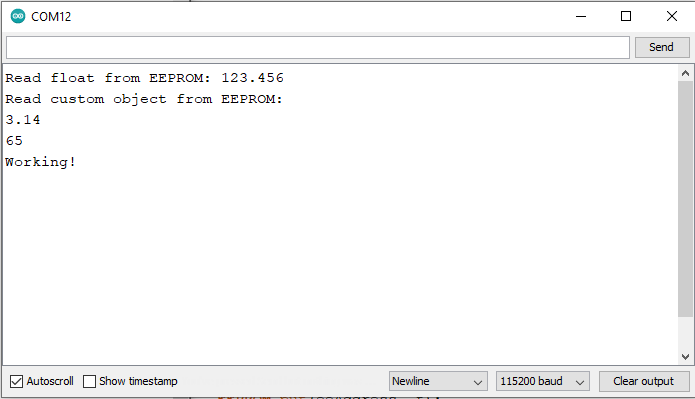
• EEPROM Get
The purpose of this example is to show how the put and get methods provide a different behaviour than write and read, that work on single bytes. Getting different variables from EEPROM retrieve a number of bytes that is related to the variable datatype.
Syntax:
EEPROM.get(address, data)Parameters:
address: the location to read from, starting from 0 (int)
data: the data to read, can be a primitive type (eg. float) or a custom struct
Returns:
A reference to the data passed in
Procedure:
- Open File -> Examples -> Under Examples for ARIES v3 -> EEPROM -> eeprom_get
- Now, Upload the code.
Output:
Once the sketch is uploaded, the float and custom structure data put on EEPROM will retrieve and displays on Serial monitor.