In this tutorial, we will see how we can interface Buzzer with ARIES V2 board. Buzzer is a very small and compact 2-pin audio signaling device which can be used in applications like alarm devices, timers, train and confirmation of user input such as a mouse click or keystroke.
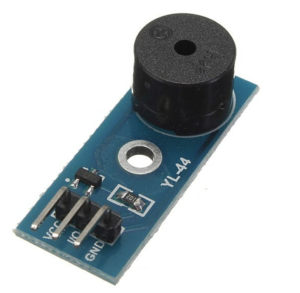
Buzzer
The buzzer is a sounding device that can convert electrical signals into sound signals. It is usually powered by DC voltage. According to different designs and uses, the buzzer can emit various sounds such as music, siren, buzzer, alarm, and electric bell.
Buzzer here used is piezoelectric buzzer which uses the piezoelectric effect of the piezoelectric ceramics. It uses the pulse current to drive the vibration of the metal plate to generate sound.
The buzzer can be used by simply powering it using a DC power supply ranging from 4V to 9V. A simple 9V battery can also be used, but it is recommended to use a regulated +5V or +6V DC supply.
Circuit Diagram
The Buzzer has three pins: VCC, I/O and GND. Connect VCC and GND of buzzer module to +5V and GND respectively of ARIES v2 board(Refer Buzzer datasheet). Then connect the I/O Pin of the Buzzer to the GPIO0 of ARIES v2 board.
Now, for powering up the ARIES v2 board via USB port of a Laptop/Desktop/PC and burning the code into the ARIES v2 board, we have to use a micro USB type B to USB type A cable. The cable should be connected to UART0 port of the ARIES v2 board, and the Laptop/Desktop/PC should be preinstalled with VEGA SDK and Toolchain.
| Buzzer | ARIES V2 board |
| VCC | 5V |
| I/O | GPIO0 |
| GND | GND |

Procedure
After setting up the toolchain and SDK path environments, clean the executable using make clean command.
cd examples/gpio/buzzer_demomake cleanBuild the example program for Buzzer by using make command
make Before transfering the built program to board, ensure that you have connected the UART0 connector of the board to the PC.
Open a new terminal, execute the following command
sudo minicom ariesNow you can see the minicom terminal opened and the board UART terminal is ready.

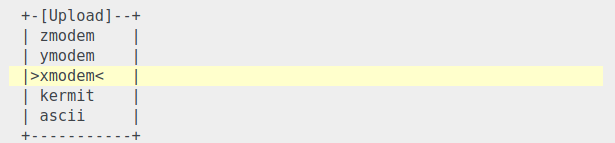
Use CTRL+A S to enter file sending menu and select xmodem by pressing Enter.
In the next window, with Space bar select the buzzer_demo.bin file to be transferred. By pressing Enter, transfer process starts.
Wait until the process is completed. The screen should display how much data has been transferred.
After completing transfer the Program will start to execute.
The beep sound with desired tone will be played through the buzzer.